Most belt buckles are removable — but only if the attachment system was designed for serviceability. In under 10 seconds, you can determine whether your belt uses a removable mechanical attachment or a permanent construction. That distinction determines everything that follows.
A removable buckle system is a serviceable construction: the attachment is designed to be disassembled without damaging the leather. Chicago screws, snap fasteners, and ratchet clamp systems are all serviceable — they allow buckle replacement, hardware upgrades, and repair without compromising the strap.
Stitched, woven, and riveted attachments prioritise lower manufacturing cost, thinner strap construction, and faster assembly. The trade-off is that the attachment cannot be serviced. The lifespan of the entire belt becomes dependent on a single hardware failure point — when the buckle fails, the belt is replaced rather than repaired.
For full-grain leather belts designed for long-term hardware serviceability, Chicago screw and ratchet clamp systems are the standard attachment methods.
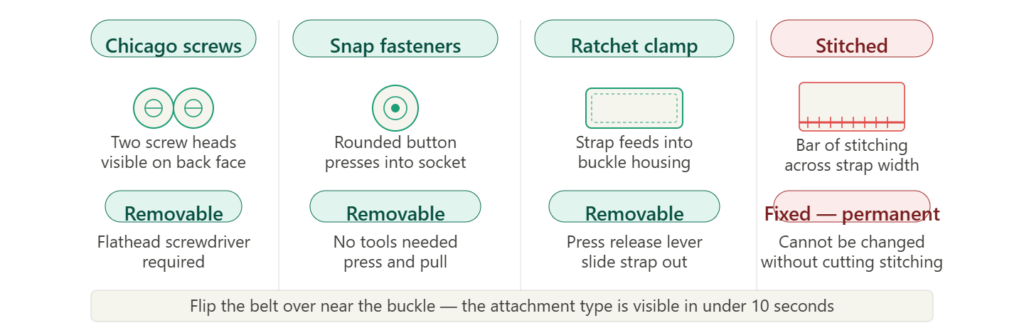
Turn the belt over near the buckle and look at the back of the strap where it meets the buckle frame.
Chicago screws: Two visible screw heads — a round post on the back face and a corresponding socket on the front. The front piece has a slot for a screwdriver. This is the most common removable attachment system on full-grain leather belts designed for long-term hardware serviceability.
Snap fasteners: A rounded button on the back that presses into a corresponding socket on the strap. Audible click when engaged. Common on Western-style belts with interchangeable decorative buckles.
Ratchet clamp: No visible hardware — the strap feeds into the back of the buckle housing and is held by an internal clamping mechanism. Standard on ratchet belt designs.
Stitched attachment: The strap is folded around the buckle frame and stitched flat — usually with a visible bar of stitching across the strap width. No screws, no snaps. Permanent.
Woven or braided attachment: The buckle is integrated into the strap construction. Most woven and braided belts are not practically serviceable because the buckle is integrated into the structural weave tension of the strap. Attempting removal compromises the strap structure.
If your belt has any of the first three attachment types, the buckle can be changed. If it has stitching, weave, or rivets at the buckle end, it cannot.
Not all removable systems are equal. Low-quality implementations fail under sustained daily wear in predictable ways:
Thin zinc-alloy screws with shallow threading. Chicago screws cut from thin-wall zinc alloy strip thread easily on installation but strip progressively with each removal cycle. A quality Chicago screw uses solid brass or stainless steel with full-depth threading.
Weak snap fasteners with loose retention. A snap that releases under light handling force will release under belt tension. Quality snaps require deliberate pressure to disengage — not the incidental force of movement.
Aggressive ratchet clamp teeth on thin backing. Low-quality ratchet buckles use deep clamp teeth that bite into the leather backing rather than distributing clamping pressure across a wider surface. Over time this causes compression damage, cracking at the clamp point, and eventual strap pullout under load. Quality ratchet systems use a wider clamp face and reinforced backing material at the clamp zone.
Plated hardware flaking at hinge and contact points. Electroplated zinc alloy buckles show finish failure at friction points within 12–18 months of daily wear. Once the plating fails, the base metal is exposed to sweat and moisture.
If a belt’s removable hardware shows any of these signs, replacement hardware should match or exceed the original specification rather than replicating the same failure.
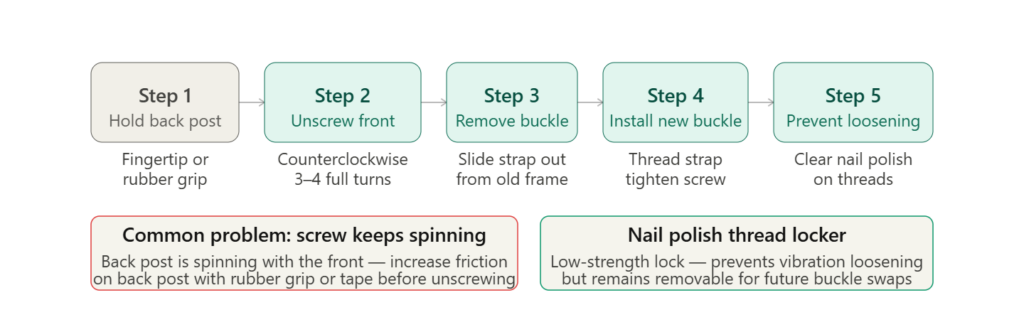
Chicago screws are two-part metal fasteners — a hollow female post and a male screw that threads into it. They provide a strong mechanical lock that holds under sustained tension while remaining removable with a standard screwdriver.
What you need: One flathead screwdriver. For slotted-post designs, two screwdrivers.
Step 1 — Identify the screw type.
Smooth post: The back face is flat with no slot — hold this side with a fingertip while unscrewing from the front.
Slotted post: Both the front and back have screwdriver slots — use one screwdriver to hold the back still while turning the front.
Step 2 — Hold the back post still.
The most common problem with Chicago screws is the back post spinning with the front rather than holding in place. Press your fingertip firmly against the back post. If fingertip pressure isn’t sufficient, place a small piece of rubber grip material or a folded square of tape between your finger and the post to increase friction.
Step 3 — Unscrew the front.
Turn the front piece counterclockwise with the screwdriver. Three to four full turns typically disengages the thread. If it feels stuck, increase back-post friction — do not apply excessive torque to the front piece.
Step 4 — Remove the buckle.
With the screw removed, the strap folds out from the buckle frame. Slide the strap out. The buckle and the two screw parts are now separate.
Step 5 — Install the new buckle.
Fold the strap around the new buckle frame the same way it was on the original. Align the holes in the strap with the post channel. Insert the back post through the strap from the back face. Thread the front screw into the post from the front face and tighten by hand, then snug with the screwdriver.
Step 6 — Optional: prevent loosening.
Leather flexes with every wear cycle. This flexing can gradually loosen Chicago screws over months of daily use. To prevent this, apply a small amount of clear nail polish to the threads of the front screw before final tightening. The nail polish acts as a low-strength thread locker — secure enough to prevent vibration loosening, but fully removable next time you want to swap buckles. Do not use permanent thread locker — this makes the screw effectively non-removable.
Step 7 — Test before wearing.
Pull the buckle firmly away from the strap in both directions to confirm the screw is fully engaged. The buckle should not shift or rotate.
Snap fasteners are used primarily on Western-style belts where buckle swapping is a deliberate design feature — the same strap accepts multiple decorative buckles.
What you need: No tools required for most snap systems.
Step 1 — Locate the snap.
On most Western-style snap designs, the snap is positioned 1–2cm from the strap end at the buckle attachment point. Press the snap button and pull the strap end away from the buckle simultaneously. The snap should release with moderate pressure.
Step 2 — If the snap is stiff.
New snaps are often tight. Press the release button firmly with a fingernail or the tip of a coin to depress the catch fully, then pull the strap away. Do not use a sharp tool — it will scratch the snap face.
Step 3 — Attach the new buckle.
Feed the strap end through the new buckle’s attachment slot, align the snap button with the snap socket on the strap, and press firmly until the snap clicks into engagement.
Step 4 — Test.
Pull the buckle away from the strap firmly. The snap should hold without releasing under normal handling force. If it releases easily, the snap is worn and should be replaced rather than used with a new buckle.
Ratchet belt buckles attach to the strap via an internal clamping mechanism rather than hardware visible on the strap surface. The clamp release is typically a lever or button on the back or side of the buckle.
What you need: No tools required.
Step 1 — Locate the release.
On the back of the buckle, find the lever, button, or tab that releases the clamp. This is typically a small lever that pivots inward toward the strap, or a press-tab on the side of the housing.
Step 2 — Release the clamp and withdraw the strap.
Press the release and pull the strap backward through the buckle housing. The strap should slide out cleanly. If it resists, confirm the release is fully depressed — partial release allows the clamping teeth to grip the strap.
Step 3 — Inspect the strap backing at the clamp zone.
Before installing a new buckle, examine the strap backing in the area that was held by the clamp. On a quality belt with a well-designed clamp, the leather should show even, shallow impressions across the clamp contact area. Deep gouges, compressed cracking, or torn fibres indicate the previous clamp was exerting excessive point pressure — a sign of low-quality clamp design. If the leather shows this kind of damage, the new buckle’s clamp system should distribute pressure more widely, or the strap section may need assessment before continued use.
Step 4 — Insert the new buckle.
Feed the strap end into the new buckle housing from the back. Push the strap through until it is fully seated. Release the clamp lever — the clamp engages the strap automatically.
Step 5 — Test the engagement.
Pull the strap backward and confirm the clamp holds. Then pull forward to confirm the ratchet engages the track correctly. Fasten and release the buckle several times to confirm the mechanism operates smoothly.
Width compatibility note: Ratchet buckles are width-specific. A 35mm buckle housing will not correctly accept a 38mm strap. Confirm the new buckle’s specified strap width matches your strap width before purchasing.
Stitched attachment: Removing the buckle requires cutting the stitching, which compromises the strap at its highest-stress point. Not a practical repair.
Woven and braided belts: The buckle is structurally integrated into the strap construction. Not practically serviceable.
Riveted attachment: Solid rivets cannot be removed without drilling, which damages the strap and rivet hole. Effectively permanent.
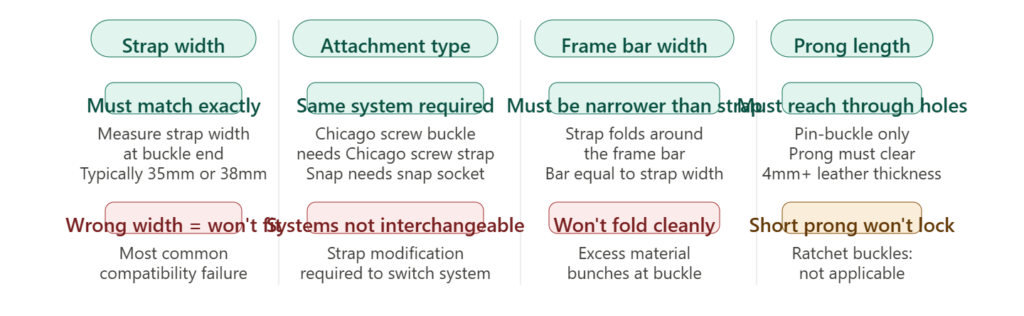
Strap width: The most common compatibility failure. Measure your strap width at the buckle end. The replacement buckle must match this measurement — typically 35mm or 38mm.
Attachment type match: A Chicago screw buckle cannot be directly swapped with a snap buckle on the same strap without modifying the strap.
Frame bar width: On pin-buckle designs, the frame bar that the strap wraps around must be narrower than the strap width. A frame bar equal to or wider than the strap creates excess material that doesn’t fold cleanly.
Prong length: On pin-buckle designs, the prong must be long enough to reach through the holes in the strap at full leather thickness.
No. Only belts with removable attachment hardware — Chicago screws, snap fasteners, or ratchet clamp systems — are designed for buckle replacement. Stitched, woven, and riveted attachments are permanent. Check the back of the strap near the buckle to identify which attachment type your belt uses.
Yes — if three conditions are met: the strap width matches the new buckle’s specified width, the attachment type is compatible, and the buckle geometry suits the strap thickness. Within those constraints, any buckle design — different shape, finish, or mechanism type — can replace the original. The most common swap is changing from one finish to another (silver to brass, or matte black to polished silver) on the same strap width and attachment system.
Snap-fastener buckles require no tools — press the release and pull the strap away. Ratchet clamp buckles require no tools — press the release lever and withdraw the strap. Chicago screw buckles require a flathead screwdriver to disengage the threaded post.
The back post is spinning with the front piece rather than holding still. Hold the back post in place with a fingertip or a piece of rubber grip material while turning the front piece with the screwdriver.
Apply a small amount of clear nail polish to the threads before final tightening. This acts as a low-strength thread locker that prevents vibration loosening without making the screw permanently fixed.
Apply a small amount of clear nail polish to the threads before final tightening. This acts as a low-strength thread locker that prevents vibration loosening without making the screw permanently fixed.
The replacement buckle must match the strap width and attachment type. Check strap width, attachment type, frame bar width, and prong length before purchasing.
A properly designed belt should allow hardware replacement without damaging the strap. When an attachment system cannot be serviced, the lifespan of the entire belt is determined by a single hardware failure point — and the strap, however well-constructed, goes with it. Serviceable construction is what separates a belt that lasts a decade from one that lasts until the buckle fails.
HoldForm belt straps and buckles are available separately — strap widths and attachment types are listed on every product page.
[View buckle range →] [How ratchet belt mechanisms work →] [Belt buckle materials: zinc alloy, brass and steel compared →] [Types of belt buckles: ratchet, pin, roller and plate →]

Practical belt guides, sizing tips, and exclusive offers — straight to your inbox.



Leave a comment